How to Make Enamel Pins (That Sell Fast)
Making your Custom Lapel Pins with us by your side is an easy, stress free process.
Whether you be thinking in use them for branding, as a part of your Employees Recognition Program, or to offer your own pin designs to your followers and/or lapel pin fans, after reading this article you will learn all the necessary on How To Make Enamel Pins.
Step by Step Guide
1 month 30 days
- Design Your Pin
In the past, this was the hardest step in order to create a pin, but it isn’t anymore.
Nowadays we not only have several design software tools available such as Photoshop, Illustrator, Corel Draw, or even free ones such as Inkscape or Gimp, but also there are online tools like Vectr or Vectormagic that will help you creating your designs almost effortless.
Regardless on the the type of software you choose, if it can export vector files it will work.
In order to create a beautiful pin you should also choose a Pantone color from their chart, taking into consideration that no gradients are allowed. Use only solid colors.
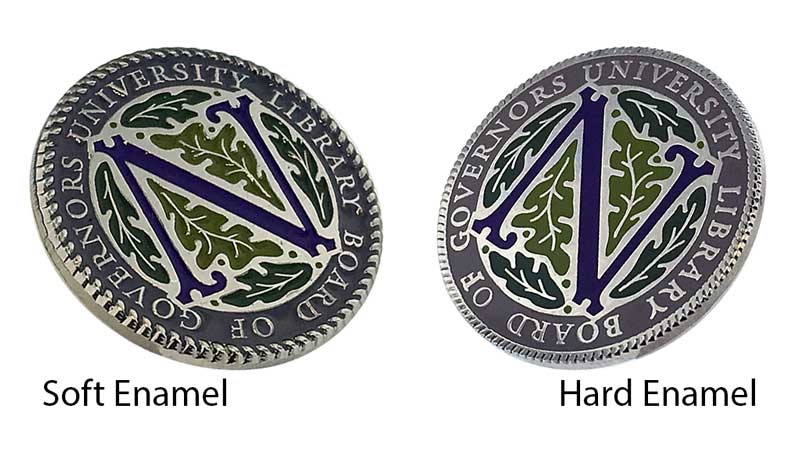
With Sienna Pacific, you can also choose to just send us an sketch or design ideas and we will help you doing the hard work for you. - Choose a Pin Style – Hard Enamel vs Soft Enamel
They both are made from die struck iron metal, however they have quite different features.
On the one hand, Hard Enamel Pins have thin metal lines separating colors and shapes, which is commonly referred to as recessed areas. Plus, they are a bit more expensive and seem more like jewelry.
On the other hand, Soft Enamel Pins feature a smooth surface, they allow more details and are a bit cheaper. Besides, you can choose to add them an epoxy final coat to give them a thinner feeling.
- Choose your Lapel Pin’s materials
Metal Lapel Pins can be made with 4 different materials, some of them allow more details than others.
Moreover, you can also choose to add them some kind of plating as we will explain in detail right below.
Brass/bronze: This is the most popular one. It allows a high amount of detail and features a nice weigh. Commonly used for branding, awards and employee recognition pins.
Iron: It is lighter and cheaper than the previous one, therefore it is commonly used as a giveaway for low budget promotional campaigns. For hat pins and golf ball markers using iron is a must.
Aluminum: This is the ideal material for offset printed pins because the colors stick on it beautifully. The downside of using this material is that aluminum is so light. However, this problem can be solved by applying bronze and an epoxy coating on to them.
Stainless Steel: The only reason you want to choose this material is when you need your pin to be hypoallergenic. Often chosen for costume jewelry.
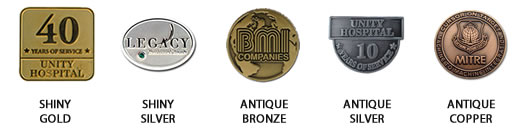
The Plating (Gold / Bronze / Silver / Black Nickel)
The style of a pin and their feeling, will directly depend on its finish.
Any of them can be done with a sandblasted background to help highlight the main shapes, layers or message on your design.
Additionally you can choose an antique finishing which makes colors look a little darker for a more formal appearance.
To make your pins really valuable ask for our 24K Gold or Silver. Imitation or real gemstones are a plus.
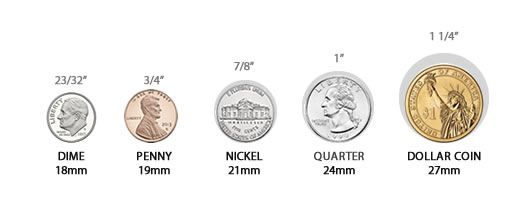
- Choose The Size (What’s the Right Size for Your Pin?)
Not all pins are small, although those are the ones people are most likely to wear. The small ones measure from 0.75 to 1.25 inches. Nevertheless, there are also big pins that can size from 1.25 to 2.25 inches.
As for our experience of more than 15 years working with custom pins, we can break down the pin’s sizes in 3 main categories, according with the type of use people give them, as follows:
Pins for Formal Suits: between 3/4″ and 1″
Pins for Volunteers (to make an impact): between 1″ and 1 1/4″
Trading pins: between 1 1/4″ and 2 1/2″
However, your pin, your size.
Take into consideration that the bigger the pin, the more expensive it’ll be.
- Choose The Packaging (Let Your Pins Sell Themselves)
With Us you can choose not just the pins design but also how would you like to receive them which is a great advantage specially for those wanting to sell them saving any further packaging efforts. We offer to delivering them to you already separated whether in elegant Backer Cards or in plastic bags.
- Choose The Backing
Pins can be attached using a needle-like system, a self-adhesive backing or a magnet.
1. Needle-like systems: choose among safety-pins, a single needle or a couple of them. Yes! Lapel Pins can have two needles or pin-backs at the rear.
If you don’t want your pin to jiggle around choose the double pin option or a safety-pin.
Then you have 3 types of clutches: Butterfly, Deluxe or Rubber. The Butterfly Clutch is the preferred one and can be made in gold or silver to better match your pin design.
2. Self-adhesive backing: they stick better on solid, non-porous materials and are easy to remove applying water.
3. Magnetic backing: this is an smart solution for those who don’t want to make a single hole in their clothes, no matter how tiny it be.
- Get Your Sample
Seven (7) days after having approved your quote and having checked out your order, you will receive an email with a picture of the first version of your actual pin for you to approve or correct. We will not go into the full production process unless you be happy with your custom pin sample first.
- Send them to Production!
Once you approve your sample it’ll be production time. The pin factory will be making as many Lapel Pins as you have ordered.
At the manufacturing process, the pin makers elaborate a mold in order to strike your artwork over a metallic surface. Afterwards, we paint, plate and polish each pin, one by one at a same-automated process. This method, called die-struck, is ideal for pins that have a flat base.
Another type of lapel pin manufacturing method is used in the case customers require a 3D shape or pins with cut-outs. This one is better known as 3D casting.
The die-struck manufacturing time takes around 3 weeks, while 3D casting (also referred to as 3D sculpting) will take much longer depending on the difficulty of the design requirements as well. - Sell Your Pins!
Many pin designers and lapel pins entrepreneurs recommend to sell your pins on Instagram. But, as the digital marketing age states, the more channels you use, the better. So, be sure to display your creations on every social media available, at least at Facebook, twitter and Pinterest. Having a proper website, an Etsy page, a Youtube video among others will increase your sales possibilities