Custom Heat Transfer Labels

No tags. No itch. Just your logo printed right into the fabric.
Our custom heat transfer labels give your brand a clean, professional, tagless look that lasts.

24h Free Quote 5-7 Day Sample 3 Week Production

Why Brands Choose Heat Transfer Labels

You know that annoying tag inside a shirt? The one everyone cuts out? Heat transfer labels fix that — forever. They bond your branding directly into the garment, creating a smooth, tagless surface that feels like part of the fabric.

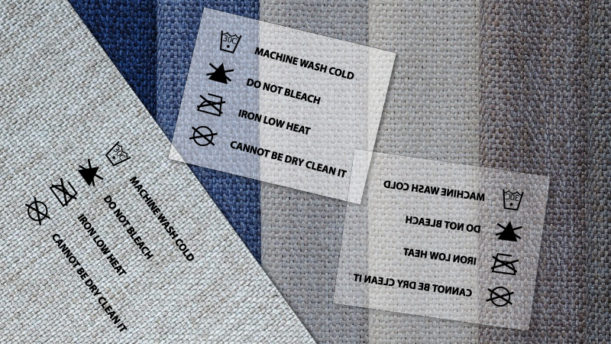
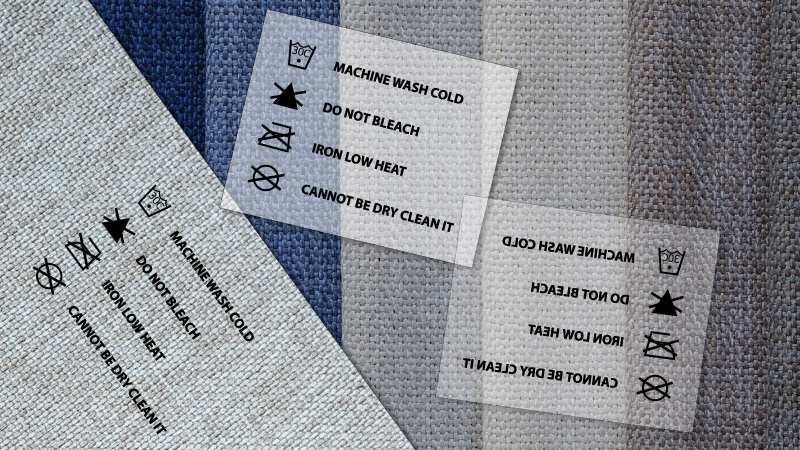
At Sienna Pacific, we make every transfer label from high-quality materials that stretch, flex, and survive 50+ washes without cracking or peeling. These aren’t paper stickers; they’re permanent, professional branding for your apparel line.

Why people love them:

  • No sewn tags: seamless comfort, perfect for soft knits and activewear
  • Full-color options: print logos, care info, and sizes in one hit
  • Durable: stands up to washing, sweat, and daily wear
  • Quick to apply: press at 302–320°F, peel, done
  • MOQ 100 pcs — great for startups, boutiques, or test runs

Expert Guidance

Real people, quick answers. We’ll refine your idea, match materials, and flag gotchas before they happen.

Easy Communication

One clear thread from quote to delivery. Proofs come fast, revisions are on us.

Premium Materials

We build products that last—clean edges, vivid color, hardware that doesn’t quit.

What Options Do I Have?

Every clothing line is different, so we offer plenty of options to get the look and feel right.

Finishes

-Matte (subtle, soft-touch)
-Glossy (bold color pop)
-Reflective (great for sportswear or safety gear)
-Metallic or Foil (for premium fashion lines)

Materials

-TPU (standard flexible film)
-Silicone (ultra-durable, soft-touch)
-Eco-friendly water-based inks

Application

-Temperature: 302–320°F
-Time: 8–12 seconds
-Pressure: medium (30–40 psi)
-Peel: warm

MOQ: 100 pieces | Lead Time: 2–3 weeks

Want traditional printed labels? See your options here.

Uses

Activewear Brands

Stretchy polyester? No problem. Heat transfer labels move with the fabric and stay put through workouts and washes. Perfect for gym wear, yoga lines, or performance apparel.

Baby Clothing

Soft, safe, and hypoallergenic. Our transfers are lead-free and gentle on sensitive skin — ideal for babywear or kids’ clothes.

Boutique Apparel

Need a polished, retail-ready look? Add your logo, size, and care instructions in one smooth print. Looks great on cotton, rayon, or blends.

Private Label or Corporate Lines

If you run a small fashion label or create uniforms, heat transfers give your garments a cohesive, elevated finish; no loose threads, no irritation.

See our iron-on labels for DIY-friendly applications.

Pricing

QuantityUnit Price (est.)ProofLead Time
100-249$$Free digital proof3 weeks
250-499$$Free digital proof3 weeks
500+$$Bulk Pricing3 weeks

What’s Included:

  • Free design proof (color + layout)
  • File check by our art team
  • 5–7 day sample option available
  • Fast U.S. shipping

How It Works

Request a Quote

Upload your logo or label file (AI, PDF, PNG). We’ll review it and prepare a digital proof.

Approve Your Proof

Check alignment, colors, and layout before printing. We only move forward when you’re 100% happy.

Production Begins

We print, cut, and package your transfers on release sheets, ready to apply.

Delivered to Your Door

Use a heat press or iron at 302–320°F for 10 seconds. Peel warm, and it’s done.

Get Your Heat Transfer Labels Price Quote

Custom patches, labels, pins & more — pricing within 1 business day.

1
You
2
Project
3
Details
Step 1 of 3
Your information
So we know who to send the quote to.
Who are you ordering for?
Please enter your first name.
Please enter your last name.
Please enter a valid email address.
Please enter a valid phone number.
Your information is never shared or sold.
Step 2 of 3
Your project
Select a product — spec fields appear automatically.
Please select a product.
Please select a quantity.
Step 3 of 3
Details & artwork
Tell us more and attach any files you have.
0 / 5000
Please describe your project (at least 20 characters).
Drag & drop files here
or browse to upload
JPG · PNG · PDF · AI · EPS · PSD · SVG · ZIP  ·  Max 20 MB per file  ·  Up to 10 files
Pricing & options within 1 business day. No spam, ever.
Request received!

We'll review your project and send pricing options within 1 business day.

Need to add more files? Just reply to the confirmation email.

Your info has been saved

Ready to make your garments feel premium?

Get a fast quote, free proof, and expert help choosing the right finish for your fabric.

Provide your basic contact information: Name, Email
Define the amount of labels you want to quote: from 100 minimum quantity to 5000+
Choose the size for your labels: Width (in.) and Height (in.)
Set Up your Turnaround options
Upload your artwork or logo
Optionally you can share with us some more information to better explain what you are looking for (numbers of colors, multiple versions).

Customer Reviews

4.8/5 – Based on 1102 Reviews

★★★★★

Great product quality (heat transfer labels) and easy to customize upon request.

Agustina H.

Questions?

Let’s Get Started

If you are thinking about ordering your heat transfer labels, just click on the button below, our expert Sales Reps will get back to you within 24 business hours and guide you through every step of the process.

Sienna Pacific Logo

How to Apply Heat Transfer Labels?

Heat Transfer Labels can be heat pressed in place using a heat press machine or an iron. They are easy to apply and once applied, they will not peel.

how to remove iron on labels step 1

Total Time Needed :

15

Minutes

Total Cost:

$0

US

Required Tools:

-Heat press or household iron (no steam)
-Flat surface or pressing pad
-Parchment paper or Teflon sheet
-Heat-resistant tape (optional)

Things Needed?

✔ Your custom heat transfer labels
✔ The garments or fabric items you’ll apply them to
✔ A timer or phone to track pressing time

Steps to Apply Heat Transfer Labels:

how to remove iron on labels
Step 1- Prep the garment

Lay the garment flat on a clean, hard surface. Make sure the fabric is smooth — no lint, moisture, or wrinkles. If it’s new, pre-press for 3–5 seconds to remove any moisture or sizing residue.

Step 2- Position the label

Place your label face down where you want it. Center it or align it with a ruler for precision. Use heat tape to hold it steady if needed.

ironing instructions Screenshot 2023-01-30 152709
Step 3 – Apply Heat and Pressure

Set your press to 302–320°F (150–160°C). Apply firm, even pressure for 8–12 seconds.
If using an iron: press straight down (no sliding) with firm pressure.

Warm beverage topped with cream in snow, perfect for winter themes.
Step 4 – Peel Carefully

Let it cool for a few seconds, then peel the film while warm. If it resists, wait a bit longer or add 2 seconds of heat.

High-resolution vintage parchment texture, ideal for creative design use.
Step 5 – Post-Press (Optional)

For extra durability, cover the label with parchment paper and press again for 3 seconds.

Chalk-drawn clock on a blackboard, symbolizing time and education concepts.
Step 6 – Cure and Wash

Wait 24 hours before washing to allow full adhesive bonding. Wash inside out, cold water, tumble dry low.

PRO TIPS

  • Test one piece before running your full batch.
  • Avoid textured fabrics (like fleece).
  • If the edge lifts, increase heat slightly or time by 1–2 seconds.
  • Store unused labels flat, away from sunlight.